|
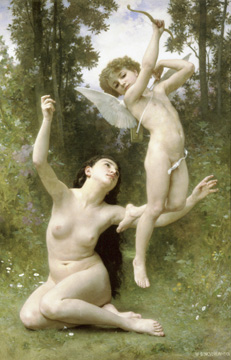
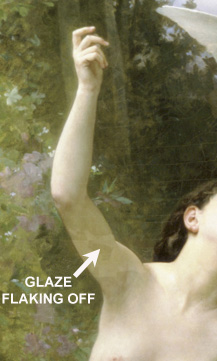
Characteristics of Oil Paint Oil paint is wonderful stuff. When you squeeze it out of the tubes out onto a palette, the colors are so beautiful they look good enough to eat (but don't!). Oil paint has the advantage of being slow-drying, sometimes (depending on how thick you lay it on) taking days to dry to the touch, so that a palette of paint can stay fresh all day, and the paint on the canvas will likewise stay wet for hours. This means that you can continue to blend colors in your painting for hours on end (and if you store your palette in a freezer overnight, one palette of paint can last for many days). If, on the other hand, you want your oil paint to dry more quickly, there are certain liquid mediums (alkyds, such as Liquin or Galkyd) that can be mixed into it that will cause it to dry within hours. This is useful if, for example, you want to build up many layers of paint as quickly as possible. Most oil paint colors are light-fast, and will retain their rich colors for centuries. This is the marvelous, durable paint which, when brushed or otherwise smeared onto some support (a painting surface such as wood or canvas) can endure for hundreds of years, as many historic paintings have. Oil paint consists of colored powders ("pigments") suspended in a liquid "vehicle" of linseed oil. Other vehicles can be used, liquids or plastic substances such as animal fats (the vehicle of the ancient cave wall painters) egg white (tempera), water (hence "watercolors"), or wax such as was used in the first century AD by the mummy portrait painters in the Fayum region of Egypt (who had to heat the wax to make it flow). Naturally some vehicles are more durable and light-fast than others. The 20,000 year old cave paintings in Europe were in perfect condition when first discovered, because for all that time they'd been sealed off from the world in an environment of constant temperature and humidity. But once the caves were opened up and people began viewing the paintings, mold from visitors' breath began growing on the organic vehicles in the paint, and they began to deteriorate. Modern oil paint in its linseed vehicle is much more durable than most of the paints of old (breathe on it all you want; it won't be affected. But don't set fire to it). The colored powders or pigments which give oil paints their colors are many and various. Black can be simply soot from a fire, others might be vegetable dyes, still others blends of all sorts of chemicals. Over time, most of these pigments have become standardized, and are found to a greater or lesser extent in any manufacturer's brand of oil paint. Cheap paints will have less pigment and more "fillers." The more durable (light-fast) colors are, as you might expect, usually found in the more expensive colors or brands. The type and amount of pigment in a paint can be determined from the fine print on the tube that the paint comes in. As to how to tell which pigments are the most durable and desirable, it's best there to defer to scientists and others who test paints. Books such as "The Artist's Guide to Selecting Colors," by Michael Wilcox, discuss the good and bad points (if any) of each pigment, and tell you how to read the labels on paint tubes so that you can find out exactly what you're buying. Some pigments, such as the popular alizarin crimson often used for flesh tones, or sap green, popular in painting vegetation, are not light-fast over the years, and should be avoided if you want your paintings to endure over the long haul. A good book on pigments will suggest more durable substitutes for the non-lightfast colors, so that you can get the same colors and effects with better paint. But an art student, such as you who are presumably reading this, is probably less interested in the substance of oil paint than he is in how to use it (you probably won't want to save your first paintings anyway, so who cares how long the colors last?). So let's move on to the subject of painting. How to Use Oil Paint A painting is created by brushing (or in some other way smearing) oil paint on some suitable surface, called a "support." Traditionally, painting supports are surfaces made of canvas or wood, but today it might be anything; some artists are even using things like sheet metal, such as aluminum honeycomb, to paint on. Whatever the surface, before painting on it, it should be prepared by coating it with a sealer or primer. You can do this priming yourself, with primers available from art supply companies, but there's not much point to it, since primed supports are available in any art supply store or catalog. Even rolls of canvas usually come with the priming already done on one side, and you can create your own canvases in any desired size or shape by stretching this prepared canvas over a custom stretcher-frame (see my tutorial DVD for how to do that). The application of paint is normally done with brushes of various sizes and shapes, but you can do it with anything: your fingers (but use gloves, since some pigments are toxic and can be absorbed through skin), cotton swabs, rags, palette knives, or any other application tool that works for you. The portrait painter John Sargent, witnesses tell us, sometimes got frustrated with brushes and just shoved the paint around on the canvas with his fingers, but even for him brushes were the norm. The illusion of realism that you get in your sketching, by shading your drawing with pencil or charcoal, is accomplished with oil paint by blending together the various colors and shades of paint. Oil painting can thus be described as drawing with paint. The blending of oil colors can be done first on the palette, and then applied to the canvas (I'll assume canvas is the normal painting surface from here on), or the colors can be blended right on the canvas. Like most painters, I do both, depending on the situation. It's handy to have some common colors already mixed on your palette (i.e., squeezed out of the tubes and mixed together with a palette knife to get the desired color), and then blend them further on the canvas with a brush. Just as you shade a pencil sketch by smearing the graphite around to give the illusion of form, so you typically put a base color on your initial sketch on the canvas, and then blend other colors into it to get the same effect. The best results, for the illusion of realism, are obtained by blending wet-into-wet, that is, adding wet paint on your brush into the wet paint you've already put on the canvas. You can, however, let a coat of paint dry on the canvas, and then put wet paint on top of the dry layer, in which case the new layer does not blend with the previous one. Both techniques have their place in realistic painting. For example, there are times when you can't get the effect you want by blending wet-into-wet. You may, for instance, want to add a pure bright white highlight onto a face or figure, but you find that the bright paint becomes dulled somewhat when mixed into the wet paint already on the canvas. In that case, you have to let the paint on the canvas dry overnight (or however long it takes) before adding the highlight. Or, to take another common situation: when painting hair, you stroke in the basic mid-tone color (as though combing the hair with the paintbrush), and then stroke in lighter and darker tones so that they blend smoothly and realistically into it. But finally, when you try to add in the lightest, brightest tones, in places where the light hits the hair most strongly, you may find once again that these highlights get blended into the wet undertones and become dulled down. Here again the solution to the problem is to let the paint that's already on the canvas dry, so that when you stroke in the highlights, they are only added on top of, not blended into, the previous layer of paint, and the new paint remains pure and bright. But this is the sort of thing that you learn by doing. Also, since many oil paint colors are semi-transparent, you can create very nice effects by building up layers of oil paint, letting each layer dry before adding the next one. Even if you do essentially the same thing on each new layer that you did on the previous ones, every layer that you add gives depth and richness to the colors in the painting. This must have been the technique used by many historic portrait painters, since we know from the writings of participants and witnesses that these portraits often took many sittings to produce (John Sargent needed over eighty sittings to get one portrait of two children right), and the paint must have at least partially dried between sittings. If the painter was working wet-into-wet, as you must do to create realistic flesh tones without glazing, then each sitting must have required a new layer, and thus the finished painting probably had many layers. This explains the richness of the color in many old portraits--you're looking through several, if not many, layers of semi-transparent paint. Then there is the technique of "glazing," just mentioned, in which you pile up thin, nearly-transparent layers of paint, called glazes, to a painting to create an effect similar to looking down through colored glass, although of course a painting cannot be so transparent as glass because the canvas, at the bottom of the layers, is not see-through. Still, building up transparent layers can produce a lovely effect. It's done by thinning or diluting your oil paints with some medium so that each layer is semi-transparent, a sort of see-through stain. You can add these glazes to a normal painting, either to achieve special effects or to simply enhance the shading you've already done. Since real human skin is semi-transparent (shine a flashlight through your hand in the dark and see for yourself), you can simulate this translucent quality in a painting, to make your portrait or figure look more real, by building up semi-transparent layers of skin-colored paint. And some of the glazing layers can be darkened and applied selectively for shading purposes. It appears to me that the great classical painter William Bouguereau, mentioned on previous pages, shaded areas on his figures by applying layers of darker colored glazes over a basic light skin color that had already been laid down and dried. I say this because I have seen some of his paintings, which were obviously not so well cared for over the years, in which some of these layers of glazing have flaked off somewhat, which lets the base skin color show through. Below is one example. In the painting "Love Takes Flight," you can see on the woman's upraised arm where some of the darker glazing has flaked off.
Shading by glazes: can you see where the dark glazes have flaked off the arm in this Bouguereau painting? Oil paint can be brushed on, wiped, dabbled, stippled, splattered, scumbled, heaped on thick or delicately glazed--use your own imagination to create a new application method--but however the artist does it, the nearly infinite variety of painting techniques is one of the things that makes oil painting so interesting--and fun! This page is under construction, with more information to come, and others pages will be added as well, so check back occasionally for additions. If you have specific questions about oil painting, contact me. |